Showing posts with label Ravelry. Show all posts

Sunday, February 23, 2014

Woven Plaid Baby Blanket

This baby blanket is so darn CUTE! I love the technique involved here as well, but I will be honest, I was a skeptic when I first read about it. I decided a baby blanket was the way to test it out.

It is incredibly simple and fairly quick to work up. You're basically making a mesh stitch blanket that is striped, and then weaving the exact same stripe pattern perpendicular through your mesh work. SO EASY!

Here's what you came for!

Hook: 6.5mm
Yarn: Red Heart Super Saver (~260yds each of Soft Navy, Soft White, Light Blue, and Country Blue)
Additional Supplies: Yarn Needle (or bobby pin)
Pattern: Woven Scotch Plaid Afghan (also available on Ravelry)
Here is the grid for the striping pattern I used. It turned out MUCH larger than I had anticipated, but I still think it looked great in the end. Next time, I might try a simpler striping pattern.


I started mine with a base chain of 123sts and went until it was about 36" x 36" Large. I added a row of SC sts along the outer edge to hide my tie-ins. If I were doing this project again, I might wait until after the weaving to do that, as there was a little change in the shape during weaving.


I marked the middle stitch and cut some of my weaving strands about 60" long. People on Ravelry complained about not having enough excess, and I felt like more was better for this project. Using the middle stitch to mark the middle of my weaving pattern, start weaving with a yarn needle. You weave with a single piece of yarn, doubled over, and you'll do two of these into EACH mesh stitch - alternating your ups and downs. You'll end up with 4 strands in each mesh (two double-strands woven).

I changed my mind and ended up using the light blue as the center section,
but you can see the first double-strand being woven here. 

As you weave, be careful to pull on your blanket. The weaving snugs it up a bit, and you're going to want to keep it as even as possible. I found that it was better to work on a table or another flat surface for this part. Unfortunately it is not a lap project. Also, after my first few strands proved to be a good length, I had my hubby build me a template so that I could cut 20 strands at a time.


When you're done weaving, tie your strands together top to bottom and then again left to right. After that, you can cut your fringe to any length you desire and you're all DONE!


Like I said, this project turned out so CUTE! And as a bonus, I got it completed and shipped off before the baby arrived. The expectant mommy and daddy got it yesterday and they loved it!

Thursday, December 5, 2013

Granny Infinity Fringe Scarf


I love infinity scarves, and I love fringe - so here is a quick and easy pattern that combines the two!

Hook: 6.5mm
Yarn: Worsted [4] Caron Simply Soft in Pagoda (teal), Passion (fuscia), and Autumn Maize (tan)

Chain 92, slip stitch in first chain st to join.
Round 1: Chain 3, dc in each of the next 2 sts, *Ch 1 and skip the next ch, dc in each of the next 3 sts*. Repeat from * to * until you reach where you started.

DO NOT JOIN.
Here’s how it becomes an infinity pattern – instead of joining, swap to the underside or back side of the granny row you just made. If you’re not familiar with making an infinity pattern, you’re going to flatten your work as if you were going to join, but add ONE HALF twist in order to reach the back of your work. Normally when you join, this is the thing you’re trying to avoid, but today, go ahead and embrace it.

You’re basically making a moebius strip, and if you never made one of those in school, check out this video for the basics.
http://www.youtube.com/watch?v=Y65oqN5_MqU


Ch1 and then 3 dc in the first ch1 gap (made when you skipped one ch st in the first half of this row) continue to *ch 1 then 3 dc in the next ch 1 gap* until you’re all the way back around at the first ch 3 you made at the beginning of the round. Sl st in the top of that ch 3 to join.

From here on, it is pretty simple.

Future Rounds:  Ch 3, 2dc in that ch 1 space. *Ch , 3dc in next ch 1 space* all the war around until you’re back where you started. Ch 1 and sl st into the top of the turning chain to join.
Stripes can be interesting, because they will always add onto the outside of the work. I did 4 complete rounds of teal, and then 1 round of my accent color.

I also added a fringe to mine. I cut pieces of yarn that were approx. 14” long, and then knotted them onto HALF of the edge (it actually goes all around the circle on one edge….though of course a moebius strip only really has one edge, so just keep adding fringe until you feel like you’ve got enough).

Wednesday, October 23, 2013

Gigi the Giraffe

Ok, so among all of the other works-in-progress, I DID manage to find time to make this adorable little critter for baby Enora's first birthday present!

The Gigi Pattern is a free download on Ravelry, so sign up if you haven't already!

Ok, so I was very bad about it, and I didn't write down the yarn, the hook, or ANYTHING! I think that I ended up using a 4.5mm hook, because I have NO idea where half of my hooks went! What is going on in the world?!

You came for the pictures of Gigi, so here they are!


I struggled a bit with attaching the head to the body. I really could not find an angle or arrangement that made me happy. I kinda went with it, and in the end, I added the mane to help hide the crazy neck angle thing (that you can sorta see from the side angle). I think it did the trick, though I wish I had decided to add a brown strand or two into the tail now.

Anyways, it seemed that Enora loves Gigi!


P.S.: Yes, I am still working away on my veil. I thought I had finally got to the point where I had the circumference done - so I pinned it on to a scrap piece of tulle to measure. And I discovered that after almost 18 FEET of lace still wasn't enough, I pretty much put it down. I still have to finish another 1.5 feet of lace for the first round, go over all 20 FEET of lace with a (simpler) round 2 of stitches, dye it to match the ivory of my dress, and sew it onto a final piece of ivory tulle. Hooooo Boy.

Friday, August 16, 2013

King-Sized Blanket

So, first and foremost, let me apologize for my long absence. It has been a CRAZY year thus far, and we're only at August!

I chose a pattern for my Lace Veil and I've been working slowly but surely away on that. I've also been busy with some home improvements. I re-did the laundry room so that I have an organized place to store ALL my bins and bins of yarn! Yay!

Anyways, all those other projects aside....

I bought the yarn for this project back at Michael's Black Friday Sale (that happens on Thanksgiving evening, instead of Black Friday). There is generally very little crowd, the deals are still incredible, and I picked up six Jumbo Skeins (744yds) of Red Heart for only $3 a piece, before my 30% Off coupon!

I know that I don't like making blankets, mainly because they take so long, but I figured that I could hold 2 strands of worsted weight yarn together to make a bulky strand, and work with a 10mm hook and it would go faster.

I planned to make a queen sized blanket, and even cast on with one of the stitches from The Complete Book of Crochet Stitches. Unfortunately, because the 2 strands I was working with were different colors, the color of the resulting stitches totally hid the pretty stitch pattern. Plus, it was a 3-row repeat pattern, which meant I spent half of my time looking up the pattern to see what row came next. I ended up shelving the project for the better part of six months.

Well, two weeks ago, the hubby and I decided that we needed a new mattress. Plus, if we're getting a new mattress, we should probably upgrade to a king-sized bed so that we have room for our 70lb German Shepherd bed hog.

"But if we get rid of the queen, we're going to need all new blankets!" I said, "and we've already got oodles of queen sized blankets for the guest-room!"

So, I pulled out the queen-sized blanket that I had started and frogged the whole thing. Yes, You heard me. I took 12" of beautiful queen sized blanket and I frogged it. And I cast on for a king.

And do you know what? I finished it. In 2 weeks. Booya!
I did end up having to hit the craft store for more yarn there at the end, but those 6 skeins would have easily finished a Queen Sized Blanket.

Ok, so here is what you came for:

Pattern: Shashaholic's Brain Dead Afghan
Hook: 10mm
Yarn: Red Heart Super Saver in Aran and Coffee (744 yds per skein, 4 skeins Aran + 4 Skeins Coffee)
Notes: I LOVED this pattern! It was easy, it was simple, and it was QUICK!


I began with ch 228, and that was about 84" after the first row. By the time I finished 6" of pattern, it was only 66"! Oh no! So that became the height of the blanket, and I just kept going until I had sufficient width. At the end, I went over the first and last rows freehand to even them out (I didn't want the wavy edge) and I added 2 rows of hdc in just white + 3 rows of dc in the mixed colors just to add a little extra flair.

Find it on Ravelry!

Monday, September 17, 2012

Little Hats for Little Kids


Just wanted to share with you all the hats I made last week for my soon-to-be niece and nephew.

Baby Sherlock Hat
Yarn: Scraps of Red Heart and I Love this Yarn
Hook: 5.5mm
Size: 12 month
Notes: I rarely follow a pattern as its written, but I did with this one and it worked out great! I think I ended up adding a single row to the bottom so that the stripes would turn out the way I wanted, but overall a great patten and a perfect fit.

Simple Granny Hat with Flower
This was something I improvised on-the-fly and I couldn't even tell you now what I did with it. Cute though, dontcha think?


On a side note, I recently got enagaged! Yay! Which means I seriously need to get cracking on the Mantilla Bridal Veil I've been threatening to make for ages. 17 yards of lace...here I come!

Monday, September 10, 2012

Hexa-Puff Baby "Quilt"

A long time ago at our local craft circle, I was introduced to the Apiary Puff and the concept of a crochet/knit "quilt" of sorts, using stuffed crochet tiles in a larger blanket design. I fell in love immediately, but I knew it would be quite the endeavor to make a whole project out of them.

Well, when Lydia (a fellow crochetter) found out she was expecting, I knew I couldn't do anything less! I changed the pattern, because I was trying to find a simpler way of making, stuffing, and then sewing together the puffs. Here is what I came up with!

Yarns: Pound of Love (in Pastel Yellow), Red Heart Super Saver (in Coral), I Love This Yarn (in Hot Rose).
Hook(s): 5mm for Pound of Love, 4mm for Red Heart, and 3.5mm for I Love This Yarn
Gauge: Overall gauge is unimportant, however, you'll want all of your hex pieces to be the same size in the end, so with every different yarn you use, test the gauge with different hooks until you match the gauge of your existing hex pieces. I had to use a different hook for each yarn to get the sizes to match!
Additional Supplies:
Stuffing (I buy $1 GOSA Pillows from Ikea and one pillow was enough stuffing for this project)
Yarn Needle
Yarn Scraps


Hexa-Puff Pattern

Back Hex:
Begin with a Magic Ring
Into the Magic Ring: Ch 3, dc, ch1, *2dc, ch1* Repeat from * to * 4 additional times. Tighten your magic ring. Sl st to top of the ch 3 to join.
Round 2: Ch 3, dc in next st, *(dc, ch 1, dc) into the ch 1 space, dc in next 2 sts* Repeat from * to * 4 more times, end with (dc, ch 1, dc) into the remaining ch 1 space. Sl st to top of the ch 3 to join.
Round 3: Ch 3, dc in next 2 sts, *(dc, ch 1, dc) into the ch 1 space, dc in next 4 sts* Repeat from * to * 4 more times, (dc, ch 1, dc) into the remaining ch 1 space and dc into the next st (right before the ch 3 that started the round). Sl st to top of the ch 3 to join.
Round 4: Ch 3, dc in next 3 sts, *(dc, ch 1, dc) into the ch 1 space, dc in next 6 sts* Repeat from * to * 4 more times, (dc, ch 1, dc) into the remaining ch 1 space and dc into the next 2 sts (right before the ch 3 that started the round). Sl st to top of the ch 3 to join. Fasten Off.

Front Hex:
Same as Back Hex for Rounds 1-4. Do NOT fasten off at the end of Round 4.
Round 5: Begin by matching up a completed back hex to your almost-complete front hex, wrong sides together. Ch 1, and sc through BOTH the back and front hex to join the two pieces together. Sc into each st and 2sc into each corner ch 1 space until you're almost all the way around. Stuff a bit of stuffing into the hex before finishing. Sl st to the top of the first sc to join. Fasten off.

Half Hex:
Same as Back Hex for Rounds 1-4. Do NOT fasten off at the end of Round 4.
Fold the hex in half so that the wrong sides are inside. Ch 1 and sc through both halves of the piece, around, placing 2sc in each corner st. Add 3-4 sc stitches along the corners closest to the fold, and sc along the fold as well (this will make edging much easier). Make sure to STUFF your half-hex before you finish sc'ing all the way around.


When you've made all of your hex pieces, arrange them how you would like them and pin in place. Sew them together using a yarn needle and coordinating yarn. Be careful to secure them thoroughly at the corners.

My blanket used 50 Hex Pieces (9 Rose, 9 Coral, and 32 Yellow) and 8 Half-Hex Pieces (6 yellow, 1 rose, 1 coral) and I used scraps of the Rose yarn to add a simple single-crochet border. Final measurements were 24" wide by 30" long.


I LOVE the look of this project, even though it was one of the most involved project's I've ever done. I'd like to make it again using yellow for ALL the hex pieces, and a honey-colored yarn for the joining round (and sewing). I think that it would look like a honeycomb and it would be adorable if paired with an amigurumi bumble bee!


My Grandma also makes Hexagon Garden Quilts similar to this one, and I think that would be a neat arrangement as well!


Lydia Showing off the Hexa-Puff Quilt!

Monday, March 5, 2012

Copy-Cat Cloche

Inspiration Hat
Copy Cat Cloche


My friend Meredith came to me with a knit hat that she absolutely loved. She asked if I could make her a replica in a different color. As we worked on it, we changed things so that we "improved" on the original hat, so that the new piece is exactly what she wanted.

Now Available on Ravelry!

Yarn: 2 strands worked together, I used Red Heart yarn from my stash
Hook: 6.5mm for hat, 5.0mm for Flower (hook not important for flower)
Special Stitches: FPDC & Magic Ring (follow the link to learn the stitch)
Additional Supplies: Safety pins or stitch markers, yarn needle
HAT:
Note: careful of the sts which get hidden behind the fpdc sts. You’ll be increasing your sts as you would with any other hat, but instead of *2dc in same st* being your increase, you’ll dc in the top of the fpdc, and then fpdc around the post also. Also, I DO NOT count the ch 3 that starts a round as a st in this pattern, I just work over top of them. You may have to fudge it with this, but you can always put the joining point in the back of the hat.
Begin with Magic ring (or ch 3 and sl st to form ring).
Rnd 1: ch 3 and dc 6 sts into ring, sl st to top of ch 3 to join.
Rnd 2: ch 3, dc in same st as joining. *FPDC around post of st immediately below the one you just made. Dc in next st* repeat from * to * around. Sl st in top of ch 3 to join.
Rnd 3: Ch 3, *dc in next dc and in top of fpdc from prev rnd. FPDC around FPDC of prev rnd. (creates increase)* repeat from * to * around. Sl st in top of ch 3 to join.
Rnd 4: Ch 3, *dc in each of the next 2 sts AND in the top of the fpdc from prev rnd. FPDC around FPDC of prev rnd. * repeat from * to * around. Sl st in top of ch 3 to join.
Rnd 5: Ch 3, *dc in each of the next 3 sts AND in the top of the fpdc from prev rnd. FPDC around FPDC of prev rnd. * repeat from * to * around. Sl st in top of ch 3 to join.
Rnd 6: Rnd 4: Ch 3, *dc in each of the next 4 sts AND in the top of the fpdc from prev rnd. FPDC around FPDC of prev rnd. * repeat from * to * around. Sl st in top of ch 3 to join.
Rnd 7: OPTIONAL – use this rnd if you want the hat to be wider/floppier. It can also be used to size it to a larger person’s head.
Ch 3, *dc in each of the next 5 sts AND in the top of the fpdc from prev rnd. FPDC around FPDC of prev rnd. * repeat from * to * around. Sl st in top of ch 3 to join.
Rnd 8: [If you did rnd 7, X=4. if you didn’t do rnd 7, X=3]
Ch 3, *skip next dc. dc in each of the next X sts AND in the top of the fpdc from prev rnd. FPDC around FPDC of prev rnd. * repeat from * to * around. Sl st in top of ch 3 to join.
Rnd 9-11: Repeat Rnd 8. You may repeat rnd 8 until the hat is as deep as you want it. Very little depth will be added with the following rnd.
Rnd 12: ch 1. Sc in each st around. Sl st to join.
This should snug up the bottom of your hat so that it fits. You can also add in another rnd of sc sts (with increases or decreases as needed) to help make you hat fit snugly.
Fasten off (or draw your loop up really big).

Pick the bottom of a fpdc line to serve as the center front of the hat. Mark this st, and fold your hat flat so that the st you marked is on the fold. Now mark a st, about 1/3 of the brim AWAY from the center st. Since you hat is folded and laying flat, you’ve got 2 layers of brim. Mark the st that is parrellel to that sts on the bottom layer. Try on your hat and check to make sure the width of the brim is as you like it. When you are happy with it, remove the center st marker.

BRIM:

I managed to work without fastening off, but if you have fastened off, re-join your yarn at one of the sts you have marked.
Row 1: Ch 1, do NOT sc in the same st as joining. SC in each of the next 2 sts. Hdc in each st across until you are 3 sts away from your next marker. Sc in next 2 sts, sl st into marked st. TURN
Row 2: Ch 1, sl st in the first sc of prev rnd. Sc in each of the next 2 sts. Hdc in each st across until you are 4 sts away from your next marker. 2sc in next 2 sts, and sl st into last sc of prev rnd. TURN
Row 3: Ch 1, sl st in the first sc of prev rnd. Sc in each of the next 2 sts. Hdc in each st across until you are 5 sts away from your next marker. 2sc in next 2 sts, and sl st into last sc of prev rnd. DO NOT TURN

Finishing Rnd: At the end of the brim, continue on with a sc in each st around the hat. This helps to smooth the shape of the brim and finish it off. Sl st to join, and fasten off.

FLOWER:
Begin with center color and a Magic Ring (or ch 2 loosely and work rnd 1 into the 2nd ch from hook).
Rnd 1: Ch 1, 5sc into ring. Sl st to join.
Rnd 2: Ch 1, work 2 sc into each st of prev rnd. Using petal color, sl st to join.
Rnd 3: Using petal color, ch 1, *sc in next st, and 2 sc in following st* repeat from * to * around. Sl st to join.
Rnd 4. *Ch 4, skip next 2 sts. Sl st into following st* repeat from * to * around. Sl st to join.
Rnd 5: In each ch 4 space [ sc, ch 1, 3dc, ch 1, sc]. Fasten Off.
Use petal color and yarn needle to apply flower to hat where desired.


Monday, December 5, 2011

Baby Blankets

It always seems like its that season, time to make baby blankets for my friends who are expecting. I have a BUNCH more to get made after the holiday season, but these were the only two that needed to get done pronto!

I found both patterns through Ravelry, and I think they both worked up quite well.

Sweet Baby Boy Blanket
Pattern Link: http://crochet.about.com/od/babypatterns/a/simple-baby-blanket-free-crochet-pattern.htm
Hook: 5mm
Yarn: Bernat Baby Sport Solid in Baby Blue + Scraps of Acryllic off-white yarn from my stash.
Pattern Modifications:
Added 10 extra sts to base chain. Doesn’t change stitch pattern.
Border Rnd 4:
The pattern as written added lots of ruffle. Since I wanted it to lay flat, I modified it a bit.
On the sides, puff st in every ch 1 sp, and dc2tog over the 2 dc sts between spaces. On the corners, dc in each dc of the previous rnd, and puff st into each ch 1 space.
(Puff st = yo and pull up a loop 4x then yo and pull through all 9 loops on hook, ch 1 to finish off puff)


Cross & Cluster Blanket
Pattern Link: http://www.redheart.com/free-patterns/one-ball-baby-blanket
Hook: 6mm
Yarn: Caron One Pound
No Pattern Modifications
[No picture available yet]

Wednesday, November 9, 2011

Rainy Day Moebius Cowl

This project was by request for Vicky. Since she already know's what she's getting, I'll go ahead and post the details.

The pattern I started with is the Snowy Day Moebius Neckwarmer Hood by Gardener's Ramblings.
I found this pattern through Ravelry, and I modified it quite a bit.

I only had one skein left of this beautiful yarn, plus, Vicky was looking for something to go with her fall coat, as it is more for rainy days (keeping her hair & glasses dry) rather than for cold and snowy days. So I chose a larger hook and a bulky yarn to make it breathable, and yet comfy.

Yarn: Lion Brand Homespun in Barrington (336)
Hook: 10.0mm (N)


Base chain was 50sts + 3 for the turning ch.
I just did a dc in each st, following the pattern for making it a moebius. Honestly, with this yarn and hook, I think it would have been great to follow the pattern as written, and I definitely had enough yarn (used the WHOLE skein). However, when I started, I wasn't sure how it would turn out.

Moral of the story: this was SUPER easy to make, and its my new favorite project. It worked up in a little less than 2 hours, and its super soft. I never liked the look or the "gimmick" of the moebius stuff before, but this was honestly a great piece and I'm definitely going to make more. Plus its a one-skein project! You can never have enough 2 hour (or less) one skein projects around Christmas time. I'm just sayin.

Tuesday, November 8, 2011

30-Minute Hat

I designed this hat to go along with my 90-Minute Scarf project. It is worked with 2 strands of worsted weight yarn, held together and worked as if they were one strand. In this project, both strands are pulled from the same skein, but you could use different yarns. It takes about 30 minutes to complete this project. I finished it in about 45, while cooking dinner, and with time taken to photograph a tutorial.

Yarn: Bernat Super Saver Solid [Worsted Weight Acrylic Yarn]
         Work two strands together as if they were one
Hook: US 9.0mm (N)
Hat Size: Adult
Find this pattern on Ravelry

Special Stitches: Front post double crochet (fpdc) and back post double crochet (bpdc)
See my FPDC/BPDC Stitch Tutorial for how to do these stitches. If you are uncomfortable with these stitches, just omit them. You will then work rnds 10 & 11 the same as rnd 5. After that, you may choose to add an additional rnd of (ch 1, sc into each st around, sl st to join) if you want to snug up the bottom.

Begin by making a magic ring. (See this tutorial I found on youtube)

RND 1: Once you have made the magic ring, ch 3, and do 8 dc into the ring. Tighten ring and sl st into the top of your initial ch 3 to join.

RND 2: Ch 3, do 2dc into each dc from the previous rnd. sl st into the top of your initial ch 3 to join.

RND 3: Ch 3, dc into the first dc, *2dc into the next dc st, and 1 dc into the following st* Repeat from * to * around until the end of the rnd. sl st into the top of your initial ch 3 to join.


RND 4: Ch 3, dc into each of the next 2 sts. *2 dc into the next dc st, and 1 dc in each of the next 3 sts* Repeat from * to * around. sl st into the top of your initial ch 3 to join.


RNDS 5 - 9: Ch 3, 1 dc into each st around. sl st into the top of your initial ch 3 to join.

RND 10: Ch 3 *fpdc into the next st, bpdc into the following st* Repeat from * to * around. sl st into the top of your initial ch 3 to join.

RND 11: Ch 3 *fpdc into each fpdc and bpdc into each bpdc* around. sl st into the top of your initial ch 3 to join. fasten off.

Rnds 10 & 11 should give your hat a snug but stretchy band around the ears.


EDIT:

Some people have had trouble getting their hat to be the right size. When working with 2 strands of yarn and a larger hook, gauge can vary dramatically from person to person. I strongly recommend that you try on your hat frequently to make sure it is the right size.

To make the hat wider, do this for your row 5:
Ch 3, dc into each of the next 3 sts. *2 dc into the next dc st, and 1 dc in each of the next 4 sts* Repeat from * to * around. sl st into the top of your initial ch 3 to join.

To make the hat longer, repeat the row 9 pattern for an extra 1-3 rows, depending upon how much longer the hat needs to be. Try it on as you work!

Monday, October 24, 2011

Baby Hoodie

Found this pattern through Ravelry and finished it a few weeks ago, but never got the pix off my camera to post them.

This "Cozy Hoodie" pattern is through the Bernat website, so it's free, you just have to give them a junk email address and sign up. I did have some gauge issues with this one, so I ended up going by the measurements written as opposed to stitch count, which was fine. I also feel like I should note that I love the way this worked up with the Red Heart Super Savers Camo. I generally HATE the way that yarn works up with dc or larger sts, but the sc and sc + ch patterns seem to look much better. In case you were ever thinking about buying that yarn.

Oh, I did add some gussets under the arms to add flexibility (seeing as it IS for a child) but I kinda freehanded those, and I don't remember now what I did.

Wednesday, March 23, 2011

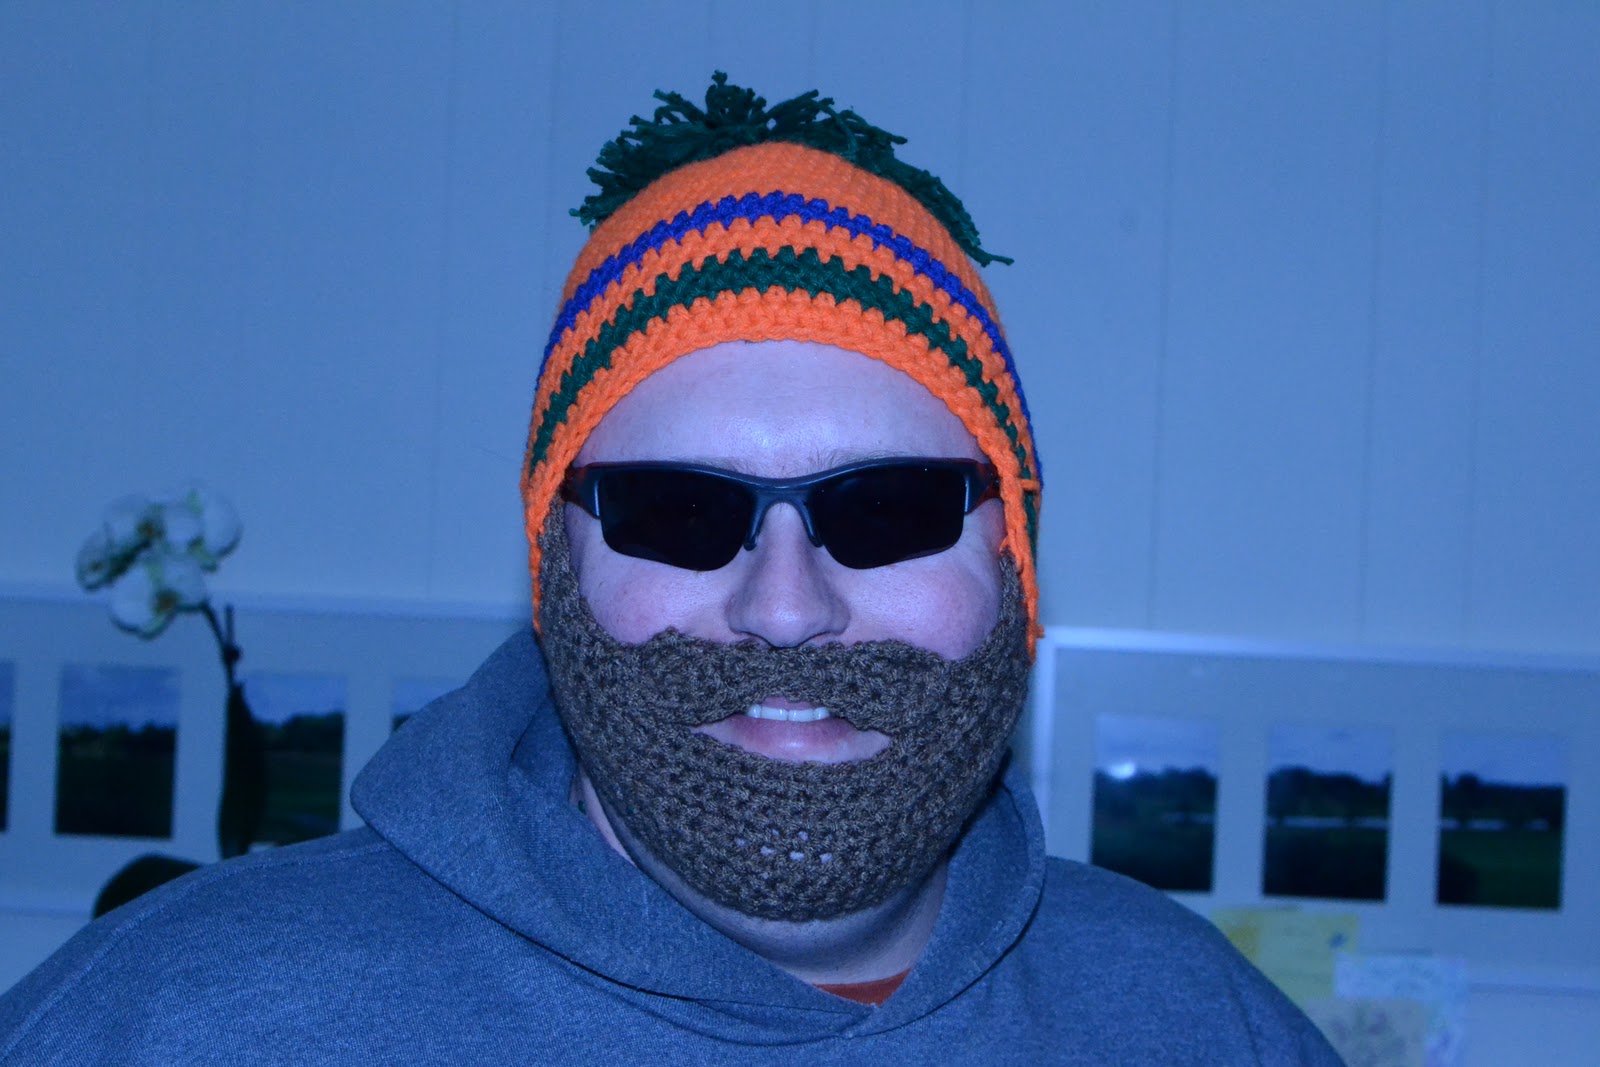
Das Beardhat - Revised

So, I headed into the construction of another beardhat, and I took the opportunity to learn from my adventures with the first BeardHat and I made the "sideburns" a little bit wider. I also made the shaping a little smoother. It should be noted that somehow, the first pattern turned out a little larger, so that may be something you want to consider if you or the person you're making it for has a larger face (whatever that is). The mustache is exactly the same.

Begin with the hat of your choice, setting aside some scraps of the hat color yarn to tack the beard onto the hat.
Yarn: Red Heart Super Saver
Hook: I use a 5mm (Most commenters have had more luck with 6.0 or 6.5)
Gauge: I don't measure this stuff....
I tend to stitch loosely, so you Definitely want to consider a 6.5 or 6.0 hook if you know you're a tight stitcher **cough**Donna**cough**

The Beard 2.0:
1.       Fsc 28 sts, ch1, turn (you could also just ch 29, skip the 1st ch on the hook and sc 28)
2.       Sc in each st across, ch1 + turn
3.       Sc in next 10 sts, repeat (2sc in next st, 1 sc in following st) over the next 8 sts, then sc in each of the remaining 10 sts, ch1, turn
4.       Sc in each st across, turn
5.       Sl st in first 8 sts, sc in next 17 sts, sl st in remaining sts, turn
6.       Sl st in first 8 sts, sc in next 5 sts, hdc in the next 7 sts, sc in next 5 sts,  sl st in remaining sts, turn
7.       Sl st in first 11 sts, sc in next 3 sts, hdc in next 5 sts, sc in next 3 sts,  sl st in remaining sts, ch1, turn
8.       2sc in first st, sc in each of the next 7 sts, sl st loosely in next 3 sts, sc in next 10 sts, sl st loosely in next 3 sts, sc in next 7 sts, 2 sc in last st. Ch 1, turn
9.       Sc in first 7 sts, sl st loosely in next 4 sts, sc2tog, sc in next 8 sts, sc2tog, sl st loosely in the next 4 sts, sc in last 7 sts, ch 1, turn
10.   Sc in first 6 sts, sl st loosely in next 4 sts, sc2tog, sc in next 8 sts, sc2tog, sl st loosely in the next 4 sts, sc in last 6 sts, ch 1, turn
11.   Sc in next first 4 sts,hdc innext 4, sc in next st, sl st in next 12 sts, sc in next 1, hdc in next 4 sts, sc in last 4 sts
12.   Bind off
The Mustache: (Pictures Added 12/24/12 to help clarify - click photo to enlarge)
1. Ch11, sc in 1st ch from hook, and sc in each st across (10 sts total)


 2.  Without chaining, sc into the side of the sc you just made, (keep going in the same direction as if working in-the-round, you may have to fudge it) and then into the back of the first 2 base ch sts. (again, you're working in the round for a moment to make a spiral effect) Sl st into the back of the next ch st.  turn.


3. Sl st into the top of the sl st you just made. Sc into the next 2 sts. 2 sc into the next st.  sc in each of the next 4 sts. Sl st in each of the next 2 sts. Sc in next 4 sts. Sc in the end of the last sc. Sc into the back of the first 2 ch sts. Sl st into the back of the next ch st.  turn.


4. Sl st into the top of the sl st you just made. Sc into the next 2 sts. 2 sc into the next st. Continue on with a sc in each of the next 4 sts. Sl st in each of the next 2 sts. Sc in each of the next 4 sts. Sl st into next st. fasten off.

UPDATE:
Hey Guys! I saw this Mustache Pattern today and thought it might be a nice alternative 'stache for the beardhat. Especially if you're having trouble with my pattern. Not sure if I would stuff it too full, but it'd be worth trying!
Use a few inches of scrap beard yarn to tack the edges of the mustache on to the beard, then use the scraps of hat yarn to tack the beard onto the inside of the hat.Pattern Note:  If making it as a gift, consider tacking it with the yarn but tie the yarn in a bow instead of a knot. That way it’s easy to adjust if needed. You could also safety pin the beard onto the hat until the person has a chance to try it on, then tack it in place for them.


GENIUS!
Laura Morris over on Ravelry had the genius idea of attaching the beard using velcro instead of a permanent attachment. "
The velcro gives the beard the ability to grow with the little ones I made them for! Plus you don’t have to be worried about different facial shapes. It’s win!" And Laura, it is EPIC WIN! I can't believe I didn't think of it! So, fellow crafters, enjoy her insights and enjoy your beardhats.

Photo Compliments of Laura Morris

Sunday, February 13, 2011

Cotton Bath Loofa

I found this Bath Poof pattern on Ravelry but never thought I would end up making it. Turns out, I got a ton of 100% cotton Sugar n Cream yarn on sale Black Friday (forever ago) and I was going to make wash cloths out of it. Instead, I tried this out for my friend Caroline's birthday gift. Perfect. These little guys are great in the shower, plus they can go in the washing machine if they get gross. I had a few people tell me that it sounded strange to them, to make a loofa out of cotton, and I have seen them made out of tulle as an alternative, but I was very happy with the way they turned out!

Tuesday, February 8, 2011

Bathtime Suds Buddy

I recently got invited to attend the birthday party of my friend's daughter, who was turning 3. I know that 3 year olds love toys, but i just can never bring myself to give a completely useless gift. I had a bunch of pure cotton washcloth yarn in my stash, and thought it would be nice to make her a bath toy out of the yarn. I found this Amigurumi Pattern through Ravelry and figured I could adapt it to be a soap saver in addition to a bath toy. I modified the body of the pattern to be smaller than the pattern calls for, and the back is made in 2 overlapping flaps as opposed to a solid piece, to create an opening to refill the soap. This has 2 simple buttons and button holes for closure.

Wednesday, January 12, 2011

Avalon Sweater

So this sweater has beeen FAR too long in the making, but I finally got it done over the holiday break. I am so glad to check this one off the list, and pleased to find it much warmer than it looks.

Started in April 2010, Finished January 2011.
Crochet with a 5mm hook using Pound of Love yarn in cream color.
Pattern found through Ravelry.com
Avalon Sweater Pattern


Tuesday, November 16, 2010

Zil Mufflers

So, Vicky got me turned on to Tribal Style Bellydance, and now I find myself wandering around the house playing my zils to practice. My teacher, Jennifer, suggested zil covers to silence them a bit so that I don't terrorize the cats and dogs (but its so much fun!). Of course, my response was, "I can make that!"

And so I did.

The pattern is one I must have found through Ravelry ages ago, and I bookmarked the website with tons of bellydance stuff for vicky.

And here's how it turned out:


Sunday, October 31, 2010

Halloween Crafts

So I finished these things a while back, but didn't want to post pictures until they were officially unveiled at our halloween party.

Here is my roommate Jenny with her Corgi-WeinerDog Kodi. I made his Candy Corn pet costume as a heavily modified version of this pattern which I found on Ravelry. Kodi is a lil chunky, so instead of working the yellow section in rounds, it is a belt that buttons at his belly. He didn't mind the costume at all and wore it all night.

My costume was the Liquor Fairy! I made garters that would hold flasks to match the shirt that I made from scrap fabric in my bin. The shirt pattern is from the new Generation-T book. I also crocheted the bandoleer and belt using a granny square style pattern, which allowed me to take the little holsters I made for the liquor bottles and slip those in between the shell stitches. I made the wings out of old beer boxes my bar tending friend Angela brought home from the bar for me. I made my tiara out of bottle caps, by drilling small holes in them and then using wire to secure them together. My wand is just a dowel with paint, ribbon, and a shot glass


Wednesday, October 13, 2010

Halloween Crochet

I have been working still on a number of projects, and that's always the way it goes. I have tabled my Avalon Sweater at least until I get some more things checked off my list. I have completed 2 blankets for the humane society, but I plan to keep working on those and using up as much scrap yarn as I can in the process. Ali wants a hat for her early-christmas present (no point in waiting until christmas when she'll have graduated already) and maybe a doggie sweater for her cute little Sadie (the Cavalier cockerspaniel).

I made Kodi (Jenny's weiner doggie) a candy corn sweater for his halloween costume. I worked my own pattern, but I used a pattern I found on Ravelry for inspiration. Kodi's has more of a belt and button method around his belly because he's a little chunky.

I was at a loss for my own halloween costume. The concept is easy: I'm going to be the Liquor Fairy, everyone's favorite halloween fairy! So I have spent the last year collecting bottlecaps and little mini bottles of rum and vodka and such to build my costume. I wired the bottlecaps together to make a tiara, but I was stuck on how to attach all the little bottles onto my belt. I wanted to be able to remove them at will and serve them to people. So, I decided to play to my strengths and crochet! Each bottle sits in a little round base, with a strap that carries up to the neck of the bottle and around. I think it should work. Now I just have to finish all the little crochet liquor holsters, and figure out where, besides the traditional belt, I will attach them to my costume.

Wednesday, October 6, 2010

Cold Classroom Shrug

So, the classrooms at school are always ridiculously cold. And ironically, its usually worse in the summer when the AC is cranked up. I promised Vicky a shrug to help keep her shoulders warm, though admittedly, that was about a year ago. Last week she presented me with a partly used skein of purple yarn and told me to have fun with it.

I used a pattern that I found on CrochetMe through Ravelry: Maui Shrug

Turned out pretty cute I think! I may have to re-use the fan stitch pattern for a scarf or something.

Tuesday, August 24, 2010

Put a Button over it

Yeah, that's the great thing about steampunk. If you screw up, you can put a gear or a brass button over it.

Crystal has started the sewing of her pleather corset, and Sam is currently disassembling a clock which my dad donated to salvage the gears. I just finished making a blue lace choker which I am rather proud of. This thing has been taking up all of my crochet efforts for the past couple of weeks, and I am thoroughly happy to see it finished.


 Here's how it looks when its on:


I found the pattern through Ravelry: http://www.theanticraft.com/archive/lugh06/asphyxiation.htm
I would eventually like to add a brass button or copper gear to the center of the rosette.
I did modify the pattern by adding a few ch5 loops to secure the rosette to the individual motifs, and I added some ch10 loops for button holes.