I sat down to create a lace mask for
Vicky’s Masquerade Wedding Reception. I started with my original pattern for
the Crochet Lace Mask, and I decided I wanted a slightly different shape for
this one. I aimed for a delicate pattern that had a pretty detail at the top
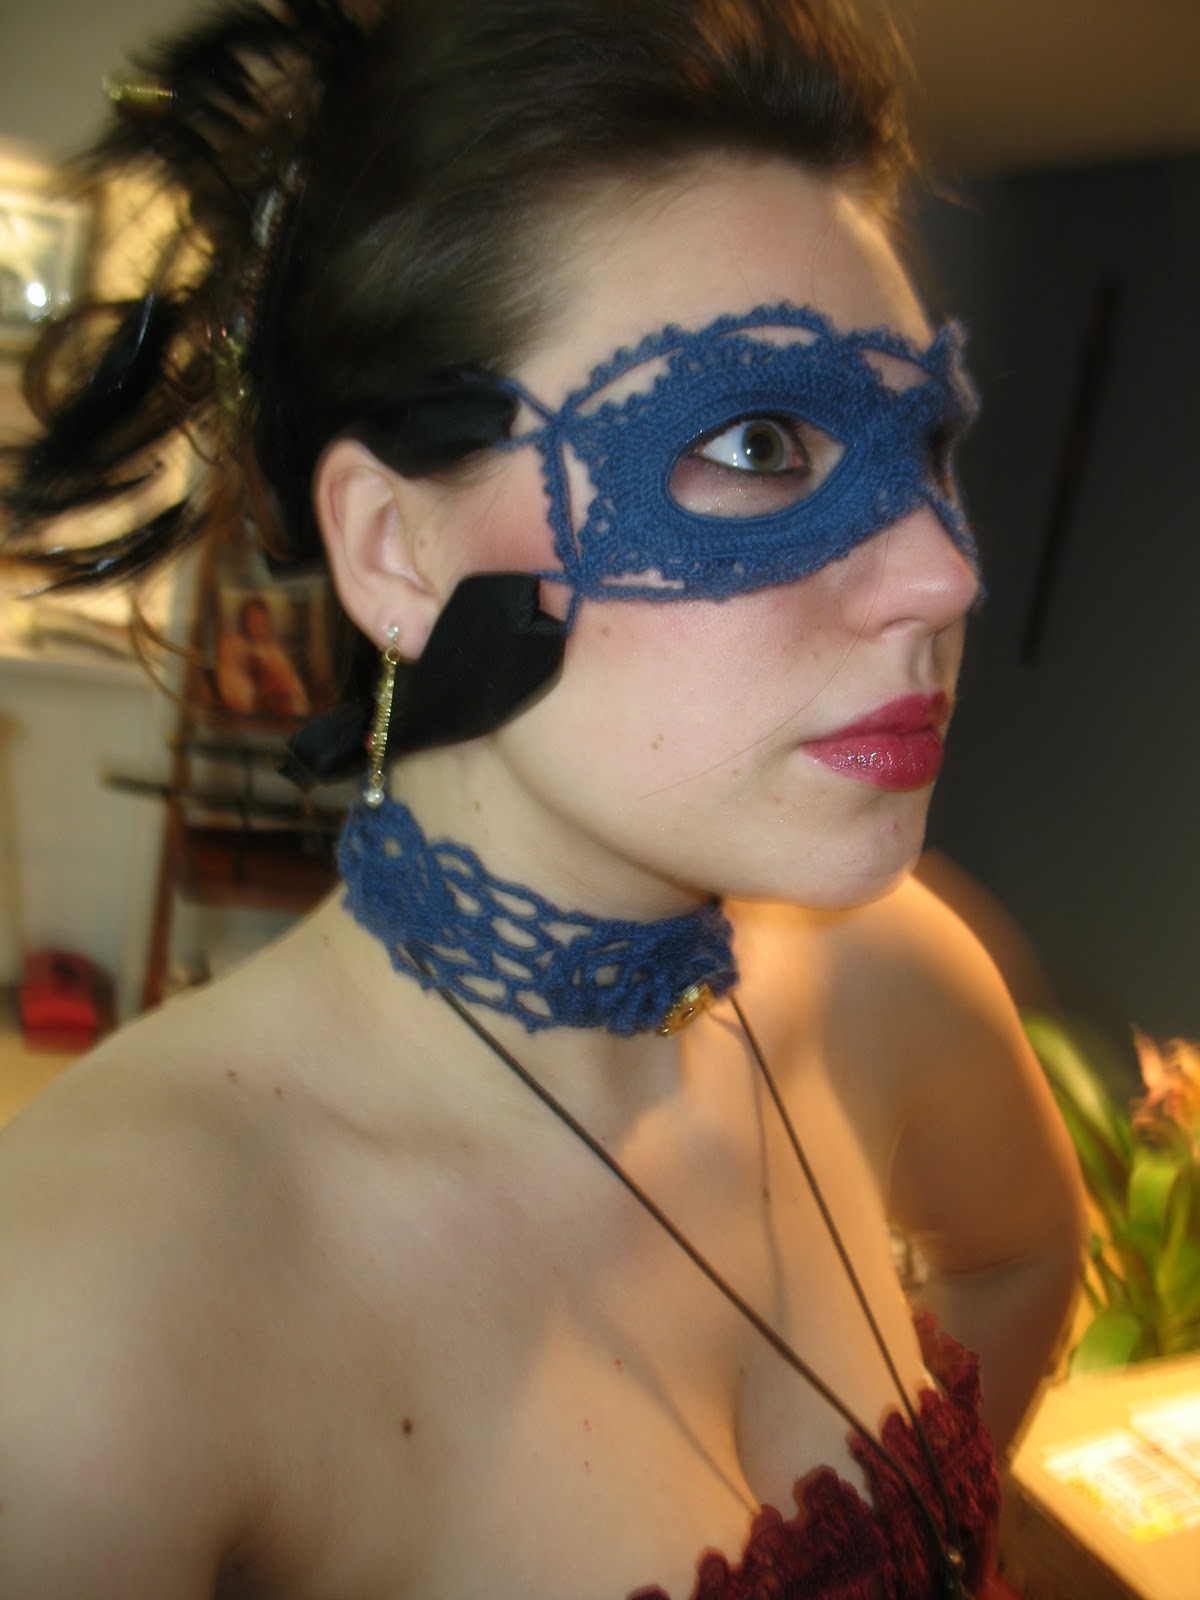
center. I also intend to wear it with a stick-handle as opposed to a ribbon, though the pictures show it being held on with a piece of black elastic.
I hope you enjoy it.
Lace
Masquerade Mask
The below pattern is my original.
Please let me know if there are any errors. Feel free to use it for charity,
personal, and theatrical use. Please do not sell for profit.
ADVANCED PATTERN. Not advised if you don’t have some experience with crochet lace.
Yarn: Aunt Lydia’s Crochet Cotton (Sz 10 – Black)
Hook: 1.5mm
Additional supplies:
about 12” of 20 gauge wire
pair of needle nose pliers
wire cutters
Needle and matching thread
1” wide ribbon (approximately 1yard) OR Decorative stick-handle OR 12-16" Matching Elastic
Small swatch of matching fabric, ribbon, or swatch of crochet made with your yarn.
about 12” of 20 gauge wire
pair of needle nose pliers
wire cutters
Needle and matching thread
1” wide ribbon (approximately 1yard) OR Decorative stick-handle OR 12-16" Matching Elastic
Small swatch of matching fabric, ribbon, or swatch of crochet made with your yarn.
Abreviations (US): Sl st = slip stitch; Ch = chain; Sc = single crochet;
Dc = double crochet; RS = Right Side; WS = Wrong side

Begin by cutting the length of wire
in half. Take each half of the wire and fold in over on itself to make a loop.
Twist the loop shut to make an oval approximately 1”x 2”. The twisted end will
be the inside corner of the eye of the mask.
Each of the eyes is crocheted
separately, however the pattern is the same for both.
Eye Pattern:
Round 1: Sc loosely around the wire, beginning at the inside corner
(twisted section) and working around. This took me 70 sc, but depending on your
stitch size, you may have to add more to make sure that the wire is completely
hidden. Sl st in 1st sc to join.
Round 2: Ch2. 1dc in each sc for 33 st. *2dc in the next sc, then 1dc
in the following sc* Repeat * to * one more time. Then finish the round with 1
dc in each sc until you are back at the twist. Ch 1 and sl st in the 2nd
ch of the ch2 that you started with to join.
Round 3: Ch3. Skip the first sts of the rnd and dc into the following
st. *ch1, skip next st, dc in following st* repeat from * to * until you are at
the outside of the eye (opposite the twist). ch 1, dc in next st. Then repeat
*to * twice. Again, ch 1 and dc in the following sts. Resume the * to * pattern
until you’re back at the twist. 4dc into the ch 1 sp from the previous round to
jump over the twist, and join with a sl st to the 2nd ch of the ch2
that began the round.
Round 4: Ch1. Sc in each dc and in each ch 1 sp around. If your work
is curling up, use 2sc in each ch 1 space when you get to the outside of the
eye area. When you get to the 4dc sts that are over the twist, simple sc into
each one and then sl st to join the round. Fasten off leaving a 5” tail.
 |
| Ignore the Bobby Pins. |
Once you have made both eyes, use
the excess wire to bind the two eye pieces together. Leave enough space so that
the flat spot made from the 4dc’s in Rnd 3 will touch when the eye piece are
laid next to each other. Use the long
tails left from binding off to sew 4-8 stitches together at the center between
the eyes.
Outside Edge:
Once your eyes have been joined, decide which is the top and
which is the bottom. At the bottom center of the nose (with RS facing), join
your thread as close as possible to where your line of sewing stitches ends. now
the “fun” begins. Please read this all carefully before you begin! (and use the chart to help you!!!)

ROW 1
You’re going to make arches around the edge of the mask. The first/last arch of the round are slightly smaller than the rest so that there is room for them in the space between the two eyes. You’re also going to vary the use of normal and short arches to fudge it so that you make it all the way around regardless of how many sts you actually have at this point. I tried putting an arch at the top of the nose and I wasn’t happy with it, so read below for how to “fudge it”. I know it sounds crazy, but it was the look I wanted.
For ALL ARCHES, the finishing sc of the previous arch is also the beginning of the next arch.
First/Last Arch Arch: skip 2 sts, (dc, ch1) 3 times plus one additional dc into following st (for a total of 4 dcs with ch 1’s in between) skip 2 sts and sc into the following st.
Normal Arch: Ch 1, skip 3 sts, (dc, ch1) 4 times into following st, skip 3 sts and sc into following st.
Short Arch: Ch 1, skip 2 sts, (dc, ch1) 4 times into following st, skip 2 sts and sc into following st. (these short arches are best used around the outside of the eyes to help prevent your work from curling excessively).
“Fudging it” Over the top of the nose:
At the end of your last completed arch, sc down the “V” to where you sewed the eye pieces together. Count your sts. Continue to sc up the opposite side of the “V” (onto the other eye piece) for an equal number of sts. Ch 1, and TURN.
Over those sc sts, working back towards the last completed arch, sc2tog, dc2tog, trc2tog, dc2tog, sc2tog. Then sl st to the sc that completed the last arch. (Depending on how many sts you sc’d, you’ll add more or less of the “2tog” sts, but always make sure you have an ODD number)
After you’re back at the last completed arch, turn, and add an arch over the “2tog” sts from the previous round, and ending with a sc on the first unworked st of the opposite eye piece from where you started. You may now continue adding arches as you did to the opposite side. Fasten off at the end of the row.
 |
| Outline Row 1 - Placement of Different Arches |
ROW 2
Try your mask on, and mark one spot on each eye where you want the mask to begin to expand. This point should be between 2 arches on their shared sc st.Because of the shape I wanted, I chose a point directly below the outside corner of my actual eye. Join your thread on the Left eye (as worn) with the RS facing.
Ch 3, *(dc, ch 1, dc, ch 1, dc) into the top center ch 1 st of the next arch. Ch 2, dc into the next sc.* Ch 2 and repeat from * to * until you’re back at the “Fudge” spot on the bridge of the nose. Here, I chose to omit the final ch 2 of the arch, and instead I just did a dc into the sc of the prev rnd. Into the arch at the bridge of the nose I did (ch 1, dc, ch 1, dc, ch 1, dc, ch 1) and then a dc into the next sc of the prev rnd. Without a ch2, I moved into the pattern to continue the arches. After the last arch of this rnd, ch 3 and sl st to join to the sc of the prev rnd.
ROW 3
Ch 1, (sc, hdc) into the ch 3 space that ended the last row. *(Dc, ch1) into each dc, ch 1, dc, ch1, and dc of the arch made in the prev row dc2tog over the ch2,dc,ch2 between arches, and ch 1* repeat * to * until you’re back at the beginning of the rnd. You may have to fudge a few sts around the bridge of the nose.
ROW 4 - Customizeable
Sc into each dc and ch 1 sp, sc2tog over each dc2tog done in the prev row. Add a small picot (ch 3, sc in same st) between sc sts or a large picot (ch 5, sc in same st) as desired. If you would like to add loops for ribbon (ch 15, sc into same st), I advise doing those in this round, placed over a dc2tog.
Center Picots:
Ch 2, dc into center st of arch, ch 2, sc into next dc st. Ch 1, turn.
Ch 1, 3sc into ch 2 sp, (sc, ch3, sl st, ch 5, sl st, ch 3, sl st) into center dc, 3 sc into ch 2 sp, sl st to next st, turn.
sl st into the 3 sc’s of the prev row, (sc, ch2, sc) into the small picot, (2sc, ch3, 2sc) into the large picot, (sc, ch2, sc) into the next small picot, and sl st into each of the next 4 sts.
Resume row 4 pattern as before. Fasten off at the end.
Once you’ve finished, I advise using Fray-Check on all of your knots. Weave in all of your ends.
Block, Iron, and Starch your mask! Take time to pin out all of the picots on your piece, if you’re impatient like me, believe me it is WORTH IT to take your time.
Sew on ribbons or glue on a decorative stick-handle as desired. You may want to use a scrap of ribbon, fabric, or crochet swatch to sew on the inside and cover the exposed wires. You can also add glitter, beads, rhinestones, and any other fabulous accessories you so desire! (I didn’t know exactly what I was making when I started, otherwise I would have worked beads into the pattern)
Ch 1, (sc, hdc) into the ch 3 space that ended the last row. *(Dc, ch1) into each dc, ch 1, dc, ch1, and dc of the arch made in the prev row dc2tog over the ch2,dc,ch2 between arches, and ch 1* repeat * to * until you’re back at the beginning of the rnd. You may have to fudge a few sts around the bridge of the nose.
ROW 4 - Customizeable
Sc into each dc and ch 1 sp, sc2tog over each dc2tog done in the prev row. Add a small picot (ch 3, sc in same st) between sc sts or a large picot (ch 5, sc in same st) as desired. If you would like to add loops for ribbon (ch 15, sc into same st), I advise doing those in this round, placed over a dc2tog.
Center Picots:
Ch 2, dc into center st of arch, ch 2, sc into next dc st. Ch 1, turn.
Ch 1, 3sc into ch 2 sp, (sc, ch3, sl st, ch 5, sl st, ch 3, sl st) into center dc, 3 sc into ch 2 sp, sl st to next st, turn.
sl st into the 3 sc’s of the prev row, (sc, ch2, sc) into the small picot, (2sc, ch3, 2sc) into the large picot, (sc, ch2, sc) into the next small picot, and sl st into each of the next 4 sts.
Resume row 4 pattern as before. Fasten off at the end.
Once you’ve finished, I advise using Fray-Check on all of your knots. Weave in all of your ends.
Block, Iron, and Starch your mask! Take time to pin out all of the picots on your piece, if you’re impatient like me, believe me it is WORTH IT to take your time.

Sew on ribbons or glue on a decorative stick-handle as desired. You may want to use a scrap of ribbon, fabric, or crochet swatch to sew on the inside and cover the exposed wires. You can also add glitter, beads, rhinestones, and any other fabulous accessories you so desire! (I didn’t know exactly what I was making when I started, otherwise I would have worked beads into the pattern)
Yarn Note: I’ve completely fallen in love with Aunt Lydia’s Crochet Cotton. The size 10 is easy enough to work with, and because it is 100% cotton, it looks lovely after just blocking it. I highly recommend it for lace projects that need to maintain their shape. Much better than whatever I used on the last mask.


Project Update: The mask looked great at the wedding! I ended up leaving it on the elastic, and it was comfortable/easy to wear with it on my face or on top of my head the whole night. I never even had to think about "Where did I leave my mask?"! So here's a picture of me in my mask and the BEAUTIFUL bride in hers!

To answer some questions from the comments (and in-person): The mask without elastic weighs just over 1 oz, so not very much thread was used. The mask took me about 10 hours total, including the time it took for me to work out the pattern, make pattern notations, block, starch, and sew the elastic. I made the mask on a day off from work, and did the blocking/etc over the next few days. I prefer the Sz 10 thread because it is easier to work with and more sturdy in the end, however sz 30 would look nice too (though would require more pattern modification).